Nơi tui viết chuyện đời
Sooner better than later
Hướng dẫn tạo ssl wildcard free với Lets Encrypt
SSL có 2 dạng chính mà chúng ta biết đến là
Single SSL: https chỉ 1 domain giống như là
https:\\example.com\
Wildcard SSL: https cho tất cả các subdomain
https:\\example.com\
https:\\sub1.example.com\
https:\\sub2.example.com\
Let’s Encrypt (LE) ngoài việc cung cấp 1 single SSL thì LE còn cung cấp cho người dùng có thể tạo wildcard SSL. Sau đây mình note lại những bước căn bản để lấy 1 wildcard SSL
Bước 1: Yêu cầu
Let’s Encrypt cần Python 2.7 or 3 và git để cài đặt
apt-get update
apt-get install python-minimal
python --version
apt-get install git-core
git --version
Bước 2: Cài Đặt Cert-Bot
Cert-Bot là 1 công cụ để lấy chứng chỉ LE
export LC_ALL="en_US.UTF-8"
export LC_CTYPE="en_US.UTF-8"
cd /opt
git clone https://github.com/certbot/certbot.git
cd certbot && ./certbot-auto
Hoặc có thể cài bằng cách
sudo apt-get install letsencryptBước 3: Tạo SSL
Để lấy chứng chỉ LE chúng ta dùng câu lệnh bên dưới
./certbot-auto certonly --manual \
    --preferred-challenges=dns \
    -d example.com \
    -d *.example.com \

certonly                Obtain or renew a certificate, but do not install it
-d                      Add domain
--preferred-challenges  Dùng link address (https.dns) or DNS TXT records (dns)
--manual                Enable Tour guide
Nếu chứng thực 1 single domain thì bạn có thể bỏ -d *.example.com
Cerbot sẽ yêu cầu bạn làm 1 trong 2 việc chứng thực domain chính là của bạn
- Dùng link address
Certbot sẽ yêu cầu bạn tạo 1 file https://example.com/.well-known/acme-challenge/zDJK5Z4X993bHWLO6sWscuDIXMeGXY1quQmxyXkg8cY và chứa 1 nội dung để chức thực
- Dùng DNS TXT records
Bạn phải add 1 records vào domain

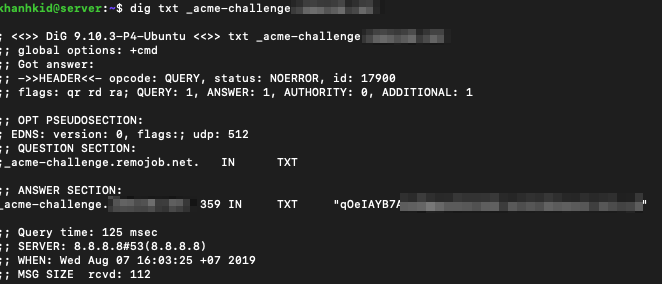
Bạn có thể dùng hàm dig txt _acme-challenge.[domain] để check TXT record đã apply chưa
Kết quả trả về là:
Nếu thành công bạn sẽ nhận được message
IMPORTANT NOTES:
- If you lose your account credentials, you can recover through
e-mails sent to [email]
- Congratulations! Your certificate and chain have been saved at
/etc/letsencrypt/live/example.com/fullchain.pem. Your
cert will expire on xxx. To obtain a new version of the
certificate in the future, simply run Let's Encrypt again.
...
Như vậy bạn đã chứng thực được Cert ở địa chỉ: /etc/letsencrypt/live/[domain]
Việc còn lại là bạn apply Cert Key vào trong Apache or Nignx server của bạn
NGINX
server {
    listen      443 ssl http2;
    server_name example.com www.example.com;

    ssl_certificate     /etc/letsencrypt/live/example.com/fullchain.pem;
    ssl_certificate_key /etc/letsencrypt/live/example.com/privkey.pem;
APACHE
SSLCertificateFile /etc/letsencrypt/live/example.com/certificate.pem
SSLCertificateKeyFile /etc/letsencrypt/live/example.com/private.pem
SSLCertificateChainFile /etc/letsencrypt/live/example.com/chain.pem
Thế là xong việc tạo 1 wildcard SSL cho domain của bạn
Bước 4: Auto Renew mỗi 3 tháng
LE chỉ cung cấp cho bạn 3 tháng vì vậy tạo 1 crontab để mỗi tháng tự động renew lại SSL là mọi chuyện ổn hết
30 0 1 */2 * /opt/certbot/certbot-auto renew && service [nginx|apache2] reload